Help Center
Create an email campaign
0 out of 5 stars
| 5 Stars | 0% | |
| 4 Stars | 0% | |
| 3 Stars | 0% | |
| 2 Stars | 0% | |
| 1 Stars | 0% |
Preparation
Creating an email campaign requires the following:
- Your sender name – See how you can manage your domain names and senders here
- Your marketing lists – See how you can manage your marketing lists here
You can also prepare your email template beforehand – See how you can manage or adapt any template here
Creation
To create a new email campaign:
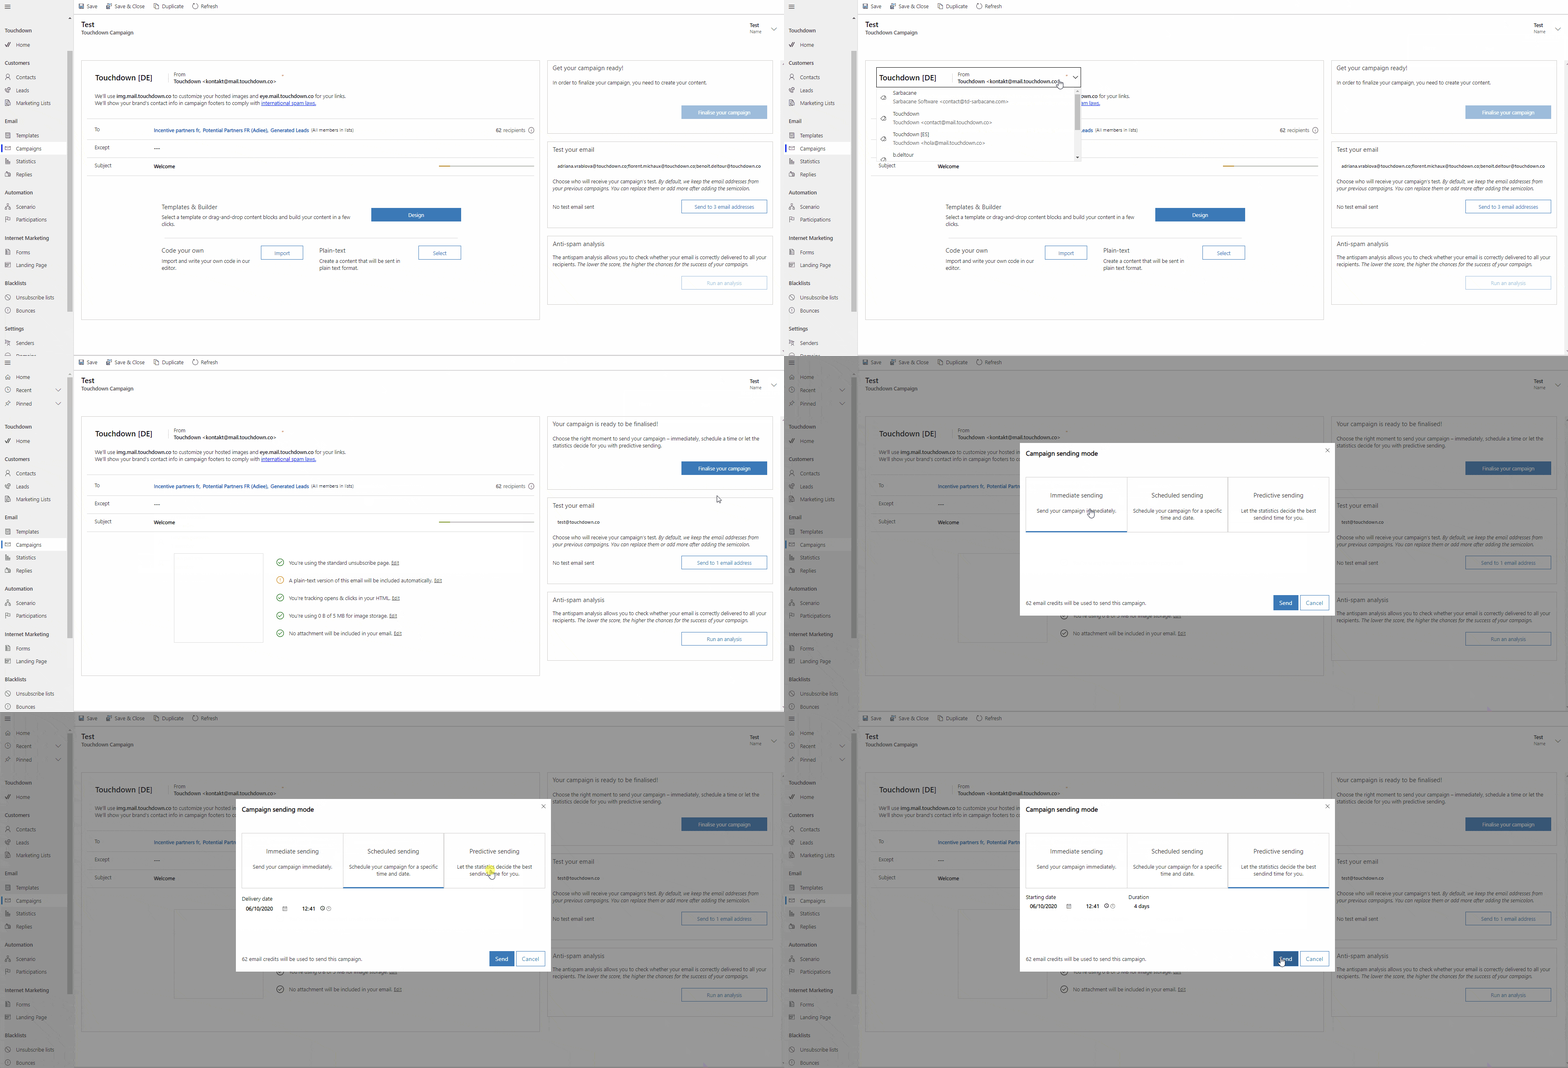
- Go to Campaigns in Touchdown menu on the left
- Click + New in the top bar
- Give a campaign an appropriate name by clicking on an arrow next to the campaign name in the top right corner
- In the Sender – From:
- Click on the From to open a list of created sender names
- Click on the appropriate sender name for your email campaign
- Add recipients by clicking next to To:
- You can combine any Leads, Contacts, Accounts and Marketing lists
- Next to Except you can exclude recipients (optional):
- You can add already created marketing lists by clicking next to Except and selecting the ones you want
- Add a Subject by clicking next to Subject
- Select how you want to prepare your email from the following options:
- Create email content according to your choice
- Once you are done, click Save & Close
- Verify the email campaign checklist (described below)
- Test your campaign (optional)
- Select sending mode for the campaign (described below)
Note: You can also duplicate an existing campaign by clicking on the name of the existing campaign to select it, then click duplicate and adapt your duplicated campaign.

Testing
After you have saved your email campaign you should verify the following checklist that will show up next to your email thumbnail:
- You’re using the standard unsubscribe page.
- Click Edit to adapt the information
- A plain-text version of this email will be included automatically.
- Click Edit to adapt the plain text of your email
- You’re tracking opens & clicks in your HTML.
- Click Edit to verify if you are tracking your email
- You’re using XX MB of 5 MB for image storage.
- Click Edit to display a list of all the images used in your email
- Next to each image you can Click On Touchdown Cloud to change their hosting and embed them in the email for to be instantly shown in the email
- No attachment will be included in your email.
- Click on Edit > Add attachments to add attachments
Once you have finished, it is recommended to send a test for your campaign:
- In Test your email click on the dashes
- Type one or several email addresses that will receive the email test
- Click Send to X email address
You can also run the Anti-spam analysis representing the possibility of your email ending up in a spam folder indicated by a number out of 5 (5 being the worst possible):
- Click Run an analysis – The closer to zero the higher chance for your email campaign to end up in the inbox folder
Sending mode
Once you have finished your email campaign and you are ready to send it:
- Click Finalise your campaign in the upper right corner to select one of the following sending modes:
- Click Immediately to send your email campaign immediately
- Click Schedule sending to program your send
- Under delivery date, click on the date
- Select the date from the calendar
- Click on the clock
- Select specific hour and minutes for the send
- Click Predictive sending to send your email based on each contact’s data to send the email campaign at the most appropriate time
- Under Starting date, click on the date
- Select the date from the calendar
- Click on the clock
- Select specific hour and minutes for the send
- Under Duration click on days to select how many days the predictive sending can take into account for the calculation of the most appropriate sending time for each contact
0 out of 5 stars
| 5 Stars | 0% | |
| 4 Stars | 0% | |
| 3 Stars | 0% | |
| 2 Stars | 0% | |
| 1 Stars | 0% |
